DIY Wedding Invites–TOTALLY worth the effort
A tight budget doesn’t mean your wedding has to skimp on class, sophistication, or style. The first impression of the wedding starts when the guests get their invites in the mail.
 My fiance and I wanted to make our wedding as environmentally friendly as possible, so I searched online for recycled invites using natural papers and fibers. Invitesite.com has a great selection of invites, sorted by style, season, or color and they include many eco-friendly and plantable options.
Rather than order a DIY kit of invitations, I went a step further and made the invites totally by hand. I based my invites on invitesite’s Orla design.
I chose to make the invitations by hand for a few reasons:
- I like cutting up paper. Always have, always will, used to get in trouble for it when I was a kid. This seemed like a good excuse.
- I’m freshly out of school and don’t have a job yet, so I have plenty of time on my hands.
- I’m freshly out of school and don’t have a job yet, so I have no money.
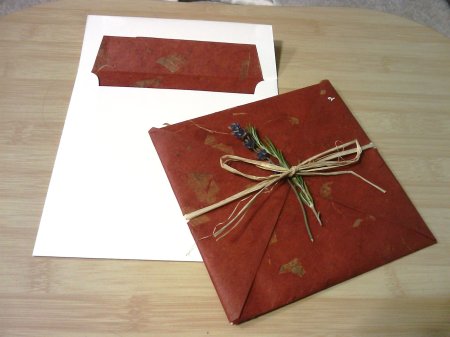
My invitation consists of a simple 6”x6” cardstock invitation within a star-fold wrapper of mulberry paper. The whole thing is tied with natural raffia and then accented with dried sprigs of lavender and rosemary, cut from my mom’s garden.
WHAT YOU’LL NEED:
- Glue sticks
- Scissors
- Natural raffia
- Dried sprigs of rosemary and lavender
- Mulberry paper
- Cardstock
- Decorative corner punch (optional)
- ¼” hole punch
- Calligraphy pen and ink (optional)
- Computer with printer
- Paper cutter
GATHERING THE SUPPLIES:
HERBS: While the flowers were all in bloom, I cut sprigs of lavender and rosemary, tied them with string, and hung them up in our utility room to dry. Other options are flowering sage, flowering thyme, skeleton leaves (available online), or any number of other things. Many craft stores or florist shops carry dried herbs and flowers.
ENVELOPES: I ordered envelopes from ActionEnvelope.com. I went with the natural colored, 100% recycled, square-flap envelopes in 6 ½” x 6 ½” for the invite and 3 5/8” x 5 1/8” for the RSVPs. (Keep in mind, square envelopes like this are more expensive to mail. These took two $0.44 stamps each.) I ran the RSVP envelopes through my laser printer to put my address on each, but I wrote my return address on the flap of the large envelopes by hand with a calligraphy pen and dark brown ink.
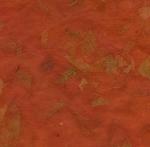 OUTER PAPER: The star-fold wrapper served as my “inner envelope”. I ordered 25”x37” sheets of Brick colored mango leaf mulberry paper from www.fineartstore.com. It’s a deep red colored paper made of mulberry fibers and mango leaves. The paper comes in sixteen different colors, but Will and I chose the brick-red because we thought it suited our fall theme (and being a Sooner, I have a fondness for all things crimson). You’ll need 9”x9” squares of this paper, so that means each huge sheet is enough for eight invitations plus enough scraps for your envelope liners.
CARDSTOCK: My ABSOLUTE FAVORITE PART of the invitation is the cardstock I used. It has an amazing silky texture, it’s printable with a laser or ink-jet printer, it takes calligraphy ink beautifully, and it looks fantastic. It comes in fifteen or so rich colors, and you will never guess what it’s made from: ELEPHANT POOP.
No, the paper doesn’t look like poop. No, the paper doesn’t smell like poop. No, the paper doesn’t taste like poop. Yes, I actually tasted it. No, I’m not kidding.
It’s made by a company called Mr. Ellie Pooh and not only do they make great paper, they’re doing something fantastic for elephants in Sri Lanka. By utilizing the elephants’ natural paper-pulping digestive system, the Mr. Ellie Pooh people are turning these pachyderms into a useful part of the Sri Lankan economy in an attempt to change the way locals see the creatures so that they’ll stop killing the elephants. So by using Ellie Pooh, not only am I getting high quality paper, it’s also a conversation piece, and I’m doing good for elephants. You can visit their newly redesigned website to read the entire story and look at all their products (which include journals, scrap books, notepads, and cards).
Ellie Pooh cardstock comes in sheets 28”x35” which makes twenty 6”x6” invitation cards. The scraps will make about eighteen 2.5”x4.5” RSVP cards.
HELPFUL HINT: Make sure you order extra paper and envelopes. You may think you’ve finalized your invitation list, but you never know when your future mother-in-law is going to tell you about her fifteen cousins you didn’t know about who will be gravely offended if they aren’t invited. And when that happens, it’s much easier to have extra paper already cut than to have to repeat the entire process all over again.
CUT THE PAPER:
I borrowed a huge paper cutter at the school where my mom works and cut all of the paper pieces: 9”x9” squares of red mulberry paper for the wrappers, 6”x6” squares of cardstock for the invites, 2.5”x4.5” cardstock for the RSVP cards.
 The envelope liners are less precise—just cut the mulberry paper scraps into rectangles about a half inch narrower than your envelopes and long enough to run from just below the glue line of the flap to tuck into the envelope pocket. Then you can snip a small angle off the top two corners to match the angles of the envelope flap. Use a glue stick to glue a liner into each envelope. (NOTE: If you’re planning to use a printer for the addresses, you should do that before you glue the liners in. I printed my return address on the RSVP envelopes, but wrote the rest by hand.)
PRINT THE INVITES AND RSVP CARDS:
This step is simple. Design the invite, pick the font, set the custom paper size, and have a little patience while you run each invite through the printer by hand. Same for the RSVP cards.
PUNCH THE RSVP CORNERS:
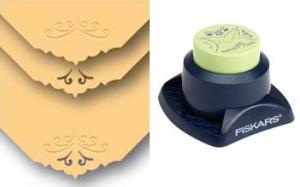
This step is optional, but it’s a nice touch. I used Fiskars 3-in-1 Heritage corner punch (available at most craft and scrapbooking stores). I punched the bottom right corner of each RSVP card. (I used the punch side, not the embossing side–my corners looked like the middle one on the right.)
NEED DIRECTIONS?:
If you need to include extra information such as directions, wedding registry, reception details, etc. you can print out separate sheets or half sheets. I included information about the wedding site and encouraged suitable footware. I also included directions and a small map to the secluded wedding site. I don’t want my guests getting lost.
PUTTING IT ALL TOGETHER!
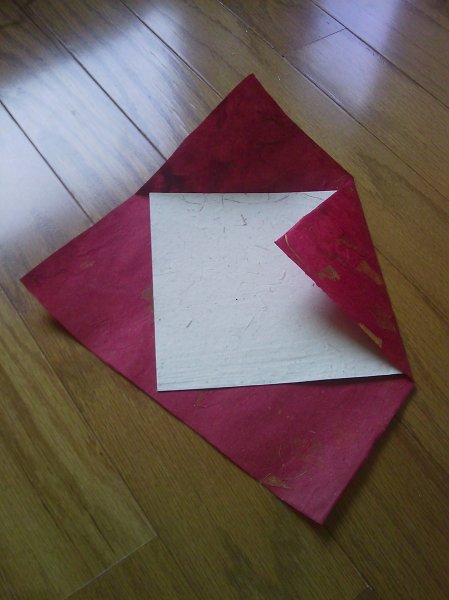
STEP ONE: Lay your wrapper square oriented as a diamond and put the invitation cardstock on top. Fold each corner of the wrapper over and make a crease. Unfold the wrapper and set the invite aside.
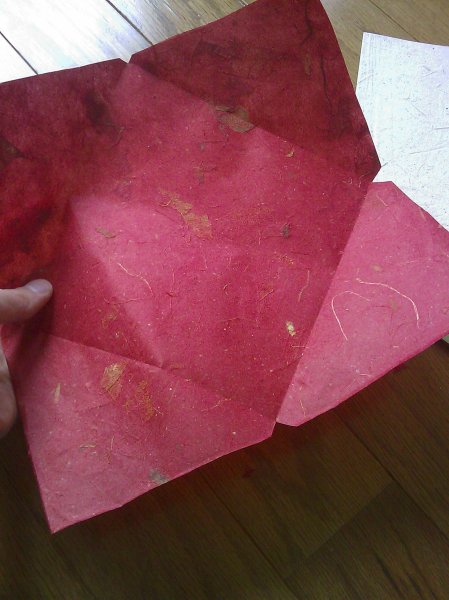
STEP TWO: Cut a notch where the creases intersect on each side of the wrapper. This will make the wrapper fold easier.
STEP THREE: Now fold two opposite corners to the middle and use the ¼” hole punch to make a hole at the midpoint of the crease.
STEP FOUR: Thread the raffia through the holes so that the ends are free on the outside of the wrapper.
STEP FIVE: Stack your wedding extra, then your RSVP envelope (don’t forget the stamp!), RSVP card, and invitation on top.
STEP SIX: Fold the wrapper corners, hold them tight, and tie the raffia into a bow.
Tuck a sprig of lavender and one of rosemary under the raffia bow and you’re done.
If you have the time to spare, it’s well worth the effort to make your own invitations. If you have scissors, a printer, and a little patience, you can have luxe invitations for less than a third of the cost.
I’ve gotten a TON of compliments on these invites, plus there’s the added benefit of knowing that a hundred people unknowingly got elephant poo in the mail.



September 21, 2010 at 7:20 pm
That is really cool! I wish I hadn’t already bought my DIY kit from Michael’s; I could have added more of a personal touch and I still have to print and assemble the whole mess! Still, I was shopping with the future husband when we saw ours and he’s a fan of Occam’s razor when it comes to the wedding stuff. He saw them first and now he has something about the wedding that he can point to and say, “I picked the invites.” That’ll make him feel good. I’ll let him get away with it if he helps with the printing and the assembly :).
Fantastic job on the invites. Your guests will definitely be impressed!
September 22, 2010 at 6:01 pm
Hi! I’m glad we inspired you to make your wedding invitations. (Actually the Carmine design 🙂
We used to have a huge handmade paper store (1995 -2002) — stocked all the papers in the full sheets . We worked with thousands of couples helping them hand make their invites the way you did. Since my partner Scott is a letterpress printer, artist, and engineer, we realized that we could make kits much cheaper and easier for everyone by creating processes to diecut and deckle the edges of our starfolds. The holes for the ribbon are diecut, too, so you don’t have to handpunch each one. (Which is a bit tedious). We created a process to deckle (rough up) all the edges of the starfold, so it would look even more rustic.
I was wondering how much money you saved by doing all that hand work. (We import most of our papers, and make our envelopes, so we keep our costs really low.) We actually came up with our kits to allow for the creativity but take out the drudge work. It is indeed fun to cut paper, but it has to be exact or it wastes so much paper.
Thanks for the mention and we’re glad we inspired your wedding!
Helen Driscoll
designer
Invitesite.com
September 22, 2010 at 7:18 pm
Lauren–I’m glad you like them! It’s good to make sure the guys have things to point to that they picked out. And sometimes the simplest solution is the best one. You can do everything yourself and make every little detail special, but sometimes if an invitation is staring you in the face it’s easier to just take advantage.
Helen–If I hadn’t had access to an enormous paper cutter to use on the master sheets of paper, I wouldn’t have gone completely DIY. Plus I was only making 100-120 invitations. Those were the factors that made the biggest difference for me in my decision. (Also, I just finished grad school and haven’t found a job yet, so I have an excess of time but not very much money.)
For our invitations we combined Orla and Carmine–we used the red color from Carmine and the rafia from Orla, but then added our own lavender and rosemary (picked from my mom’s garden).
The paper cutting took a LOT of time; I won’t pretend it didn’t. Punching holes, snipping notches, it was all time consuming. My un-deckled paper edges don’t look as rustic and pretty as the ones from invitesite and I do have some wasted scrap paper leftover (which I will use for other purposes or recycle).
My invitations ended up costing me about $1.67 each and a lot of hours. On invitesite the invitations Orla and Carmine start around $2.75 – 2.90 each (for 100-199 invites) plus $.50 for the RSVP kit. It’s absolutely the best price I found anywhere for invitations–especially for eco-friendly invites. AND they also had my favorite selection of designs. (You and Scott certainly know what you are doing!)
But I was only making 120 invitations. $200 saved was definitely worth the hours of work for me. BUT if I was having a larger wedding, say 200 to 400 invitations, that definitely would not have been the case. The ordered invite kit (in those numbers) would only cost about $2.25 each plus the $.50 for RSVP card and envelope. The amount of work I did to cut all the paper would not be worth the small amount of money saved with those sorts of numbers.
Even if a bride doesn’t want to go all the way and cut the paper squares like I did, DIY kits can save a lot of money and allow you some great customization options. During my invite shopping, I ran across some beautiful invitations that didn’t suit our wedding style nearly as well and cost sometimes $6 per invitation (which is almost as much as we’re paying per-guest for the catering at the reception). Companies like InviteSite.com definitely make a great argument for DIY and green invitations.
Jessica