Archive for September, 2010

I bet you didn’t know Elephant Poop was GREEN!

Posted in Stuff, wedding with tags , , , , , , , , , , , , on September 23, 2010 by Jessica Lada

I wrote about my DIY invitations the other day and I wanted to add a little information about my experience dealing with Karl at Mr. Ellie Pooh.

I first ran across the elephant paper at the Sedgwick County Zoo and thought it was awesome.  I bought a story book made from the paper and looked up the website to see what was what.

When I showed the paper to my fiance Will, we decided we had to use it for the invitations.  I wanted samples of the colors, so I tried to order 5″x7″ cardstock pieces of several colors, but some of the hues I wanted to see weren’t available.  I emailed the company and asked what to do.

Karl responded and told me to put the additional colors in the merchant notes and tell them “Karl says so” and he gave me a discount code to cut down on the shipping cost.  Not only did they send me samples (free of charge) of the additional colors I requested, they sent me a STACK of cardstock containing every color available, plus a bookmark AND a journal.

Of course the carstock was beautiful and I ordered the sheets for my invitations.  But then I thought, wouldn’t it be wonderful if I could share the Ellie Pooh story with all my wedding guests?

I wrote to Karl again and asked if I could have a couple more information sheets to have available at the reception so my guests could read the story of the Sri Lankan elephants.

This is what Karl sent me:

That is a stack of well more than 100 Ellie Pooh stories and over 200 business cards printed on Ellie Pooh cardstock.

On a personal note, I used to volunteer at the Sedgwick County Zoo (on and off for seven years) and one of the perks was getting to feed the elephants by hand.  Most people have seen elephants from far away, but up close they are remarkable.  You can see intelligence and emotion in their eyes.  They are playful and kind.  They paint better than some art majors and dance better than most white guys.

Plus another great bonus: by using Ellie Pooh Paper, you’re saving trees.  Saving trees and elephants at the same time–now that’s awesome.

If you’re still skeptical about paper made out of elephant poop, I’ll make you a deal.  Send me an email at jlada42@gmail.com and give me your address and I will personally send you one of these Ellie Pooh stories and a business card so you can see, feel, smell, and taste the paper yourself.

DIY Wedding Invites–TOTALLY worth the effort

Posted in wedding with tags , , , , , , , , , , , , , , , , , on September 21, 2010 by Jessica Lada

A tight budget doesn’t mean your wedding has to skimp on class, sophistication, or style.  The first impression of the wedding starts when the guests get their invites in the mail.

My fiance and I wanted to make our wedding as environmentally friendly as possible, so I searched online for recycled invites using natural papers and fibers.   Invitesite.com has a great selection of invites, sorted by style, season, or color and they include many eco-friendly and plantable options.

Rather than order a DIY kit of invitations, I went a step further and made the invites totally by hand.  I based my invites on invitesite’s Orla design.

I chose to make the invitations by hand for a few reasons:

  1. I like cutting up paper.  Always have, always will, used to get in trouble for it when I was a kid.  This seemed like a good excuse.
  2. I’m freshly out of school and don’t have a job yet, so I have plenty of time on my hands.
  3. I’m freshly out of school and don’t have a job yet, so I have no money.

My invitation consists of a simple 6”x6” cardstock invitation within a star-fold wrapper of mulberry paper.  The whole thing is tied with natural raffia and then accented with dried sprigs of lavender and rosemary, cut from my mom’s garden.

WHAT YOU’LL NEED:

  • Glue sticks
  • Scissors
  • Natural raffia
  • Dried sprigs of rosemary and lavender
  • Mulberry paper
  • Cardstock
  • Decorative corner punch (optional)
  • ¼” hole punch
  • Calligraphy pen and ink (optional)
  • Computer with printer
  • Paper cutter

GATHERING THE SUPPLIES:

HERBS:     While the flowers were all in bloom, I cut sprigs of lavender and rosemary, tied them with string, and hung them up in our utility room to dry.  Other options are flowering sage, flowering thyme, skeleton leaves (available online), or any number of other things.   Many craft stores or florist shops carry dried herbs and flowers.

ENVELOPES:     I ordered envelopes from ActionEnvelope.com.  I went with the natural colored, 100% recycled, square-flap envelopes in 6 ½” x 6 ½” for the invite and 3 5/8” x 5 1/8” for the RSVPs.    (Keep in mind, square envelopes like this are more expensive to mail.  These took two $0.44 stamps each.)  I ran the RSVP envelopes through my laser printer to put my address on each, but I wrote my return address on the flap of the large envelopes by hand with a calligraphy pen and dark brown ink.
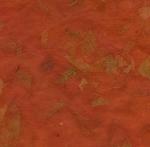
OUTER PAPER:     The star-fold wrapper served as my “inner envelope”.   I ordered 25”x37” sheets of Brick colored mango leaf mulberry paper from www.fineartstore.com.  It’s a deep red colored paper made of mulberry fibers and mango leaves.  The paper comes in sixteen different colors, but Will and I chose the brick-red because we thought it suited our fall theme (and being a Sooner, I have a fondness for all things crimson).   You’ll need 9”x9” squares of this paper, so that means each huge sheet is enough for eight invitations plus enough scraps for your envelope liners.

CARDSTOCK:     My ABSOLUTE FAVORITE PART of the invitation is the cardstock I used.  It has an amazing silky texture, it’s printable with a laser or ink-jet printer, it takes calligraphy ink beautifully, and it looks fantastic.  It comes in fifteen or so rich colors, and you will never guess what it’s made from:  ELEPHANT POOP.

No, the paper doesn’t look like poop.  No, the paper doesn’t smell like poop.  No, the paper doesn’t taste like poop.  Yes, I actually tasted it.  No, I’m not kidding.

It’s made by a company called Mr. Ellie Pooh and not only do they make great paper, they’re doing something fantastic for elephants in Sri Lanka.  By utilizing the elephants’ natural paper-pulping digestive system, the Mr. Ellie Pooh people are turning these pachyderms into a useful part of the Sri Lankan economy in an attempt to change the way locals see the creatures so that they’ll stop killing the elephants.  So by using Ellie Pooh, not only am I getting high quality paper, it’s also a conversation piece, and I’m doing good for elephants.  You can visit their newly redesigned website to read the entire story and look at all their products (which include journals, scrap books, notepads, and cards).

Ellie Pooh cardstock comes in sheets 28”x35” which makes twenty 6”x6” invitation cards.  The scraps will make about eighteen 2.5”x4.5” RSVP cards.

HELPFUL HINT:  Make sure you order extra paper and envelopes.  You may think you’ve finalized your invitation list, but you never know when your future mother-in-law is going to tell you about her fifteen cousins you didn’t know about who will be gravely offended if they aren’t invited.  And when that happens, it’s much easier to have extra paper already cut than to have to repeat the entire process all over again.

CUT THE PAPER:

I borrowed a huge paper cutter at the school where my mom works and cut all of the paper pieces:  9”x9” squares of red mulberry paper for the wrappers, 6”x6” squares of cardstock for the invites, 2.5”x4.5” cardstock for the RSVP cards.

The envelope liners are less precise—just cut the mulberry paper scraps into rectangles about a half inch narrower than your envelopes and long enough to run from just below the glue line of the flap to tuck into the envelope pocket.  Then you can snip a small angle off the top two corners to match the angles of the envelope flap.  Use a glue stick to glue a liner into each envelope.  (NOTE: If you’re planning to use a printer for the addresses,  you should do that before you glue the liners in.  I printed my return address on the RSVP envelopes, but wrote the rest by hand.)

PRINT THE INVITES AND RSVP CARDS:

This step is simple.  Design the invite, pick the font, set the custom paper size, and have a little patience while you run each invite through the printer by hand.  Same for the RSVP cards.

PUNCH THE RSVP CORNERS:
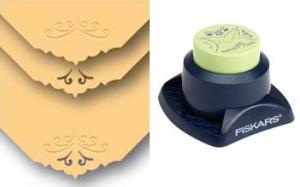
This step is optional, but it’s a nice touch.  I used Fiskars 3-in-1 Heritage corner punch (available at most craft and scrapbooking stores).  I punched the bottom right corner of each RSVP card. (I  used the punch side, not the embossing side–my corners looked like the middle one on the right.)

NEED DIRECTIONS?:

If you need to include extra information such as directions, wedding registry, reception details, etc. you can print out separate sheets or half sheets.  I included information about the wedding site and encouraged suitable footware.  I also included directions and a small map to the secluded wedding site.  I don’t want my guests getting lost.

PUTTING IT ALL TOGETHER!

STEP ONE:  Lay your wrapper square oriented as a diamond and put the invitation cardstock on top.  Fold each corner of the wrapper over and make a crease.  Unfold the wrapper and set the invite aside.
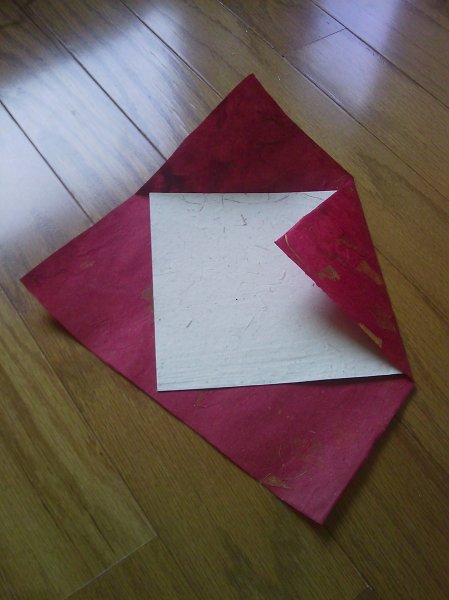
STEP TWO: Cut a notch where the creases intersect on each side of the wrapper.  This will make the wrapper fold easier.
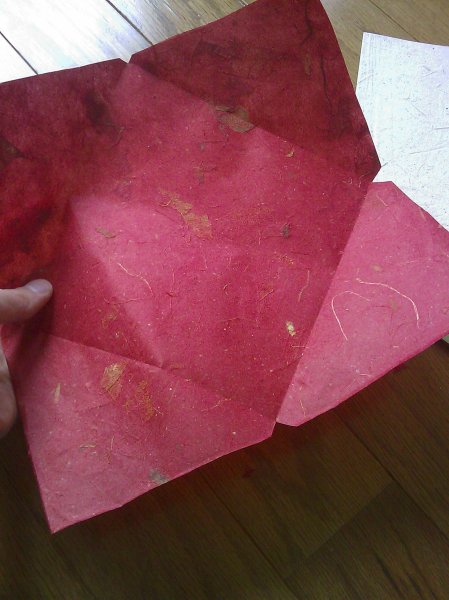
STEP THREE: Now fold two opposite corners to the middle and use the ¼” hole punch to make a hole at the midpoint of the crease.

STEP FOUR:  Thread the raffia through the holes so that the ends are free on the outside of the wrapper.

STEP FIVE:  Stack your wedding extra, then your RSVP envelope (don’t forget the stamp!), RSVP card, and invitation on top.

STEP SIX:  Fold the wrapper corners, hold them tight, and tie the raffia into a bow.

Tuck a sprig of lavender and one of rosemary under the raffia bow and you’re done.
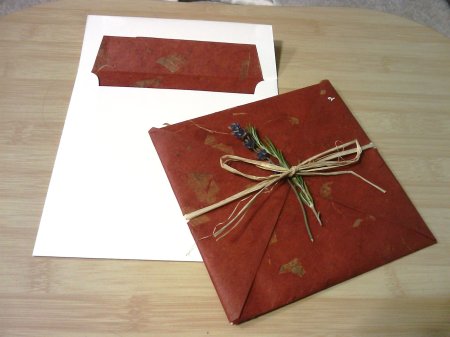
If you have the time to spare, it’s well worth the effort to make your own invitations.  If you have scissors, a printer, and a little patience, you can have luxe invitations for less than a third of the cost.

I’ve gotten a TON of compliments on these invites, plus there’s the added benefit of knowing that a hundred people unknowingly got elephant poo in the mail.

“Beautiful Day” at the Denver Downtown Aquarium

Posted in Stuff with tags , , , , , , , , , , , , , , on September 21, 2010 by Jessica Lada

DENVER TRIP CONTINUED… After spending several hours walking around in not-yet-broken-in-cowboy-boots, I needed to rest my feet for a while.   We opted for the restaurant inside Denver’s Downtown Aquarium and were pleasantly surprised.  This wasn’t overpriced cafeteria “you have no other choise so you’ll eat and pay anything” food that you find at many museums. The atmosphere was fantastic with a high ceiling, warm lighting, and a full wall of aquarium.  We ordered the fried onion stack appetizer.  It was so good that I forgot to take a picture before devouring it.  And the unique part is that mixed in with the fried onions are occasional pieces of breaded and fried jalapenos and pickles.  (They are noticeable, so if you don’t like jalapenos or pickles you can easily avoid them).

My fiance Will and his souvenir drink. He looks happy!

The restaurant has six specialty drinks that come in souvenir glasses—Will and I each ordered one and they were delicious. Next time I go to the aquarium, I’m going to save room for the desserts because I’m eager to try the Aquarium Crème Brulee, complete with fish-shaped cookie decoration.  A table near us ordered the Big Shark Attack dessert, which is basically a chocolate cake with molten center, plus Heath bar pieces, vanilla ice cream, and a shark-shaped cookie. The aquarium itself was great.  It isn’t the largest aquatic exhibit I’ve seen, but it was unique.  I liked that the aquarium wasn’t limited just to fish, but it also had birds that live on shores as well as tigers (which apparently love to play in the water.  There was a fun section that simulates a flash flood in the desert.  It splashes and mists on the more willing participants of the tour (though there is a dry path for those who’d rather stay on the safe side).

A zebra shark below a porthole in the floor. Those are the toes of my boots at the bottom of the photo.

The coolest parts of the aquarium are at the end, as they should be.  There’s a huge tank with sharks bigger than people, complete with several portholes in the floor so you can actually stand above the sharks and look down at them.  There are a couple of tanks full of jellyfish, which are hypnotic to watch. At the end of the tour there is a shallow pool filled with rays.  They come up to the side of the tank and you can pet them with one finger.  You can also buy sardines and hand-feed the rays.  You hold the fish between your knuckles with all your fingers curled under (so the rays can’t grab your fingers) and make sure your hand is at least a foot under the water (so the rays won’t jump out of the pool after the fish).  There’s no way to describe how cool it feels to feed a ray.  It turns adults into giggling six year olds.  And the rays look pretty happy about it too.

Yes, that is the “face” of a ray, up against the glass.  Isn’t he cute?

Wedding Ties That Don’t Suck

Posted in wedding with tags , , , , , , , , , , on September 20, 2010 by Jessica Lada

Ivory with electric blue ink for the groom, electric blue with white pearl ink for the groomsmen.

The BLUE theme continues, this time for the groomsmen.  They aren’t wearing matching suits, but instead we got them matching ties.

My fiance’s groomsmen don’t wear ties often, so I thought if they HAVE to wear ties, at least it can be a tie they like.   Etsy strikes again, this time with Ties That Don’t Suck from the Cyberoptix Tie Lab.

Etsy.com  is rapidly becoming my favorite website ever.  I probably did a search for “awesome ties” or something like that.  At first I just saw the wheat at the top of the design and thought it was perfect.  It IS a Kansas wedding, after all.  But then I looked at the name of the design and discovered how perfect it really was.

THE BEER TIE (pictured above) has a design of wheat, barley, and hops.  Turns out, the three ingredients combine to make not only tasty beverages but also awesome tie designs.  In our chosen colors it looks a little bit like Wedgewood.

Cyberoptix got the microfiber swatches and ink samples to me in just a couple of days and they cut you a price break when you order ties in multiples for your wedding party.  Cyberoptix Tie Lab doesn’t silkscreen custom designs because the setup cost is too great.  But that’s no worry because they have enough designs to fit pretty much any customer or occasion, not to mention the more than 40 microfiber colors to choose from and virtually any color of ink you can imagine.  The possibilities are endless.

Kansas Wind + Wedding Veil? No Thank You!

Posted in wedding with tags , , , , , , , , on September 17, 2010 by Jessica Lada

Here’s the setting for the wedding:  It’ll be on a creek in the middle of nowhere in the tallgrass prairie of the Kansas Flint Hills.  There’s a long, gradual hill leading down to the creek, then a small ledge and a rock shelf below.  The grasses will be turning gold to match my hair.  My flowers, as well as the groom’s boutonniere, will be shades of cream, ivory, and white.   Kansas has a lot of wind, so I don’t want to wear a veil.  I don’t think I’m much of a veil girl anyway.  So I decided to have a gorgeous updo.  But I wanted to have some sort of decoration in my hair.

I stumbled across one of my favorite Etsy shops:  WhichGoose.

She makes crowns, tiaras, clips, and combs from natural vines, pinecones, dried leaves, along with fabulous fabrics and silk flowers.  The designs are earthy, romantic, and uniquely sophisticated.  I had the TOUGHEST time choosing a design, but I finally settled on a comb with an ivory pinecone rose, dried bay leaves, and small silk roses.

The dusty, muted hues go perfectly with my color scheme.  WhichGoose absolutely nailed my custom comb and gave me exactly what I asked for.  Not to mention, it came wrapped up in the prettiest package.

If this comb doesn’t say elegant prairie bride, I don’t know what does.

“Rain, I don’t mind”

Posted in Stuff with tags , , , , , , , , , , , , , , , , , on September 17, 2010 by Jessica Lada

For our ONE day in Denver several months ago, Will and I hoped to go to the Rocky Mountain Arsenal National Wildlife Refuge (heck of a name) and hike the nature trails.

Rocky Mountain Arsenal National Wildlife Refuge -- The Creek -- photo by David Mendosa

With views like that, how could we NOT want to visit the park?  But unfortunately, Denver had different plans for us.

We improvised and headed first to breakfast at a local place called “Snooze”.  (That’s another post.)

After the best breakfast EVER we headed a little farther downtown.  We parked at the Aquarium and then headed northeast on Water Street to Platte.  We went for a stroll through REI, which is basically the mountain version of Cabela’s or Bass Pro Shop.  Kansas doesn’t have mountains, so I’d never seen a store where you can actually buy climbing ropes, ice axes, pitons, and all the other things I have heard of from Reader’s Digest.  And then there was THIS:

It’s an indoor, four-story-tall, climbing pinnacle.  There are ropes in different positions for climbs of varying difficulty, all the way from beginner (I watched a five-year-old scale it to the top) to advanced.

I ended up buying a Dynaflex Pro Gyro Hand Exerciser.  It’s a pretty awesome gadget made with the principles of a gyroscope.  You pull the cord to get it spinning and then grip the sphere and rotate your wrist, pushing against the resistance to increase the internal rotation up to 13,000 rpm.   It doesn’t just work your grip, it works all the muscles in your hand wrist, forearm.  It’s not just for mountain climbers.  It’s great for writers (like me), guitarists, artists, or pretty much anybody who works with their hands.

Then we found Savory Spice Shop at 1537 Platte Street.  I bought a dozen vanilla beans (at the best price I’ve found at any store, real or online), along with jars of powdered cheddar cheese, Parmesan Pesto Sprinkle, Platte River Rib Rub, Red Cloud Peak Seasoning, Lodo Red Adobo, and Gunbarrel Venison Sausage Spice.  We might have gone a little overboard.

While paying for our spices, we tried free samples of Freeze Dried Corn.  It sounds weird, I know, but it was like sweet popcorn.  When I reorder spices soon, I’m definitely getting a big bag of the corn.

NEXT STOP: Denver Downtown Aquarium…

The Wedding is Near! Time for accessories…

Posted in wedding with tags , , , , , , , , , on September 16, 2010 by Jessica Lada

We’ve been engaged since Last July and the wedding is now less than a month away.  I’ve spent pretty much all summer planning, which is why the last post on here was roughly A BAZILLION YEARS AGO.  Anyway, during the course of my wedding planning I’ve run across some really great craftspeople and products that are going to make our wedding really special.  It’s all in the details!

And speaking of details, when my fiance set out to buy my engagement ring, he insisted it was a blue diamond.  It’s my favorite color and it’s always the first color on the canvas when I paint.  Forget Tiffany’s.  He went down to the diamond district in NYC and bought the most beautiful engagement ring ever.

No worrying about that pesky “something blue” for me!  I wouldn’t say blue is my “wedding color” (no blue flowers or decorations or anything like that) but I am doing some little blue touches in the wedding.

I turned to Etsy.com in search of non-stabby earrings.    I don’t have pierced ears, so it’s generally very difficult to find earrings I can wear that are not either extremely uncomfortable or butt-ugly.   I have never had pierced ears.  I never intend to have pierced ears.  Not only am I mildly terrified of needles, but on matter of principal I object to having additional, unnecessary holes added to my body.  (Plus I have a pet cockatoo who regularly flings my glasses across the room.  I wouldn’t want to give him any ideas with earrings.)

I found these blue rough gem earrings, wrapped with antiqued silver wire. AND the seller said she could make them clip-ons for me.  And that’s lucky news, because she has a slew of gorgeous earrings and other goodies at her shop, Ample Goddess Jewelry.

Not only do these earrings match my engagement ring, they’ll give a nice sparkle in all the wedding photos, AND it’s going to be a nice little touch in memory of my late Grandpa Ed.  He faceted and polished stones and did wire-wrapping.  These earrings look like something Grandpa would have made for me if he were still around.

They came in the mail today and I couldn’t be happier.  The clips are antiqued silver, just like the wire, the color is perfect, and they don’t hurt my ears.  My ears will be happy at my wedding!